If you’re a videographer, you should have already heard about ATEM Mini Extreme ISO and how it can make your live streaming seamless.
Indeed, Blackmagic Design is known for being the standard for small independent filmmakers. They’re also known for their software called DaVinci Resolve, which is a Hollywood standard color-grading software. The company also has a consistent demand in assisting creators in the creation of high-quality streams.
With its self-contained HDMI video switcher and streamer that can easily advance your projects significantly, the ATEM Mini Extreme is easily a fantastic tool for you.
As a content producer who wants to expand your setup with additional cameras, we recommend you dig deeper into how the ATEM mini extreme can help you.
And don’t worry, because we will help you with everything that you need to know.
As we welcome 2023, HayotFilms will present you with a detailed and thorough review of the equipment. Whether you are planning to get one or are just curious about it—this read is for you.
Here, we will take a meticulous look so you would know if this piece of a machine will be a good fit for you and your filmmaking career.
We will discuss everything from definitions, product specifics, comparisons, features, and many more.
Without further talking, let’s get right into it!
What is ATEM Mini Extreme?
Before we discuss the deeper details, let’s know what an ATEM Mini Extreme is first.
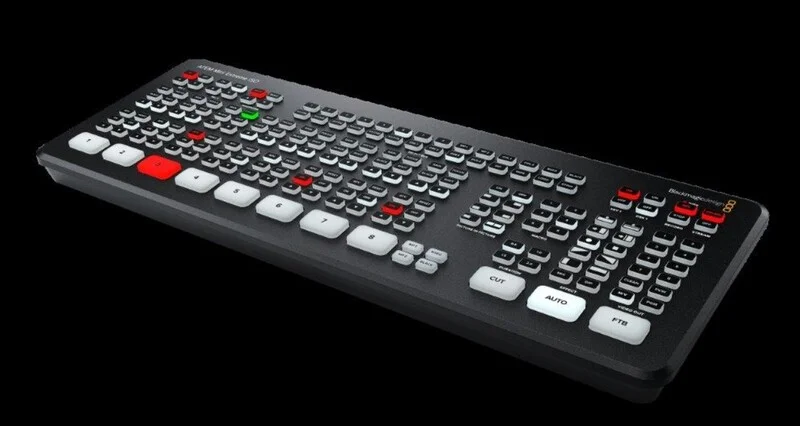
Well, this largest video switcher in the ATEM Mini family is actually the Blackmagic ATEM Mini Extreme.
Simply put, switching allows you to feed video from many cameras into an ATEM Mini box and then output one stream for viewers to watch.
Imagine a straightforward three-camera setup with the presenter on camera one (1), a broad studio shot on camera two (2), and a guest on camera three (3).
Since you’re filming live and can’t edit afterward, you have a box with buttons that displays Cameras 1, 2, and 3. The video feed switches once you tap the button for the camera you wish visitors to see. If you look at it, you can actually edit in real-time.
Brilliant, isn’t it?
While the equipment is very intelligent by itself, the ATEM Mini Extreme standardizes the video stream formats—which is a hidden gem of technology that you might not even be aware of yet exists.
As long as all feeds are in the same format and prepared for streaming, you may mix and change cameras easily, thanks to the ATEM Mini Extreme!
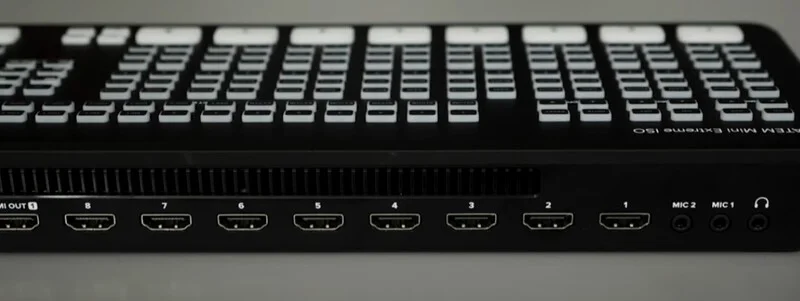
During your live streaming on Zoom, Skype, Teams, or any other platform you want, you may choose between an amazing 8 HDMI input thanks to the ATEM Mini Extreme.
The tiny video switcher has made it feasible to transmit live music events from village halls, new product debuts, lectures, and all kinds of inventive broadcasts with multi-angle videos.
In addition, every ATEM Mini model improves on the characteristics of the one before it, and the new ATEM Mini versions seem to have been appearing almost consistently over the past year.
Although the ATEM models have been available for a while in the market, their size and cost prevented them from being widely used by smaller or home productions. There were still types of equipment that are less expensive that are made for homes. Although they frequently just include basic switches and fades.
With this particular ATEM Mini Extreme, Blackmagic Design has simplified the design of their professional switches and made them accessible at a price and skill level so that more and more videographers and content creators can use the technology.
How Does It Differ from the ATEM Mini Extreme ISO?
Basically, the additional ISO in the name means that it can actually record the whole event, and not just live stream it. Other than that, it’s typically the same product.
What does ISO stand for, anyway?
In layman’s terms, the term “ISO recording” describes the capacity to record isolated inputs from your camera. You may record each camera separately with ISO, which offers you a lot more creative freedom when editing.
The ATEM Mini ISO can use any device that can produce a signal through HDMI to deliver that same functionality to your online streaming on a much smaller scale.
The ATEM Mini switcher also goes a step further by making it simple to move from one camera to another. This implies that you may now replicate the multi-camera look and manner of a professional live broadcast rather than streaming performance from a single camera.
You can record each of the video channels as separate feeds and the resources used in the stream for the additional money you pay for the ISO.
The price difference between the basic Mini Extreme and the ISO model is around $300.
Product Specifics At a Glance
Upstream Keyers: 4
Downstream Keyers: 2
Advanced Chroma Keyers: Up to 4
Linear/Luma Keyers: Up to 4
Transition Keyer: DVE only
Total Number of Layers: 9
Pattern Generators: 5
Color Generators: 2
DVE With Borders and Drop Shadow: 2
Interface: Minimum monitor resolution of 1366 x 768
What Are the Main Features of the ATEM Mini Extreme ISO to Look Out For?
The ATEM Mini Extreme ISO is the top model in the ATEM Mini lineup. So, its features are surely what you’re waiting for to dig deeper into. And we’ll get into that right now.
Below are the most prominent features of this exemplary filming equipment that you can experience if you get one.
- 8-Channel HDMI Live Streaming Switcher
- Supports up to 1080p60
- RTMP Streaming via Ethernet or USB-C
- Record Program Out and Individual Inputs
- 11-Input, 2-Channel Audio Mixer
- Input Frame Rate and Format Converter
- Re-Sync on All HDMI Inputs
- HD Multiview Output with up to 16 Views
- Local and Software Switching
- 4 x Upstream, 2 x Downstream Keyers
Certainly, the ATEM Mini Extreme ISO offers you powerful broadcast functions and an integrated control panel.
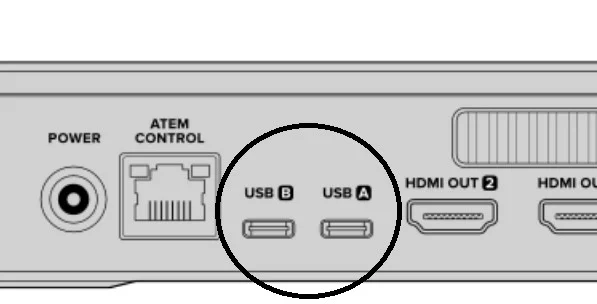
In addition to live streaming utilizing Real Time Messaging protocols, your program can also be output over USB like a camera. Using one of the USB Type-C ports, you can record each of the eight input movies as an MP4 independently, according to the switcher’s ISO label.
We also recommend reading our newest similar blog post “Canon C70 vs R5 C: An Owner’s Perspective on Both Cameras“
The switcher creates a DaVinci Resolve project file for you so you can edit and clean it up afterward, too.
All eight separate HDMI inputs on this flexible switcher handle all common HD feeds up to 1080p60. Each input allows re-syncing for seamless switching between a variety of professional and consumer cameras, gaming consoles, computer feeds, frame rates, and format converters.
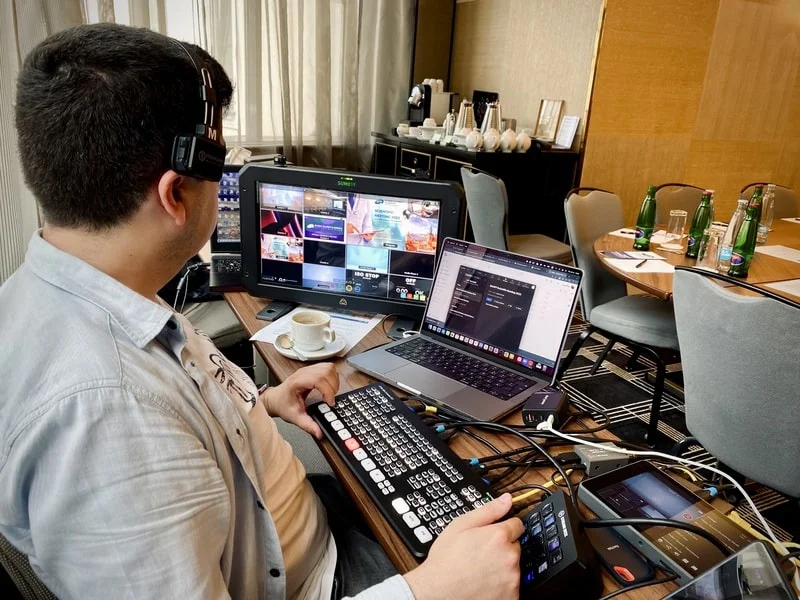
By pressing buttons on the control surface or utilizing the software control panel, you may switch, add effects, color grade, and key in real-time, too.
The Mini Extreme ISO features HDMI outputs to feed monitors and supports up to 16-screen multiview. It is intended for live streaming or webcam use.
Now, that’s a lot of features!
Technically if you are aiming for:
- Low-cost
- Multi-camera
- Compact item
- Live production with advanced broadcast features
- High-end work output
- Better-quality images
- Loads of video effects
- Faster video production + live streaming
- Self-contained broadcast quality switcher
…then getting the ATEM Mini Extreme ISO should be something you need to look into as it can really help you with what you do best.
Proper Handling of Your ATEM Mini Extreme ISO
Undoubtedly, Blackmagic Design distinguishes itself from the rest of its competitors by hiring excellent product designers.
In addition, you would also still have a sense of the broadcast in the aesthetic and feel of the company’s equipment. This is due to the fact that this type of equipment must have plenty of cooling, wires, and big glowing buttons.
Despite this, the structure and design are very modern and the size is perfect for most side pockets or camera bags. It is extremely portable and practical due to its compact size and lightweight.
To handle it properly, make sure that it’s always in its case when not in use and that you take extra care when dealing with the equipment. Keep it in a bag where it has enough breathing room, too.
This way, you’re sure that your ATEM Mini Extreme ISO is well taken care of.
Setting It Up
Preparing to set up your ATEM Mini Extreme ISO is very straightforward too. As a filmmaker, you should have no trouble following these basic steps.
At a glance, this equipment may appear scary at first because of all the cables and controls. But, utilizing the device is actually easy.
And with that being said, getting comfortable with ATEM Mini Extreme ISO and understanding what each function performs won’t take long.
Here is a basic guide to setting it up. Follow along with us so you can set up your device seamlessly.
#1 Plug the Power
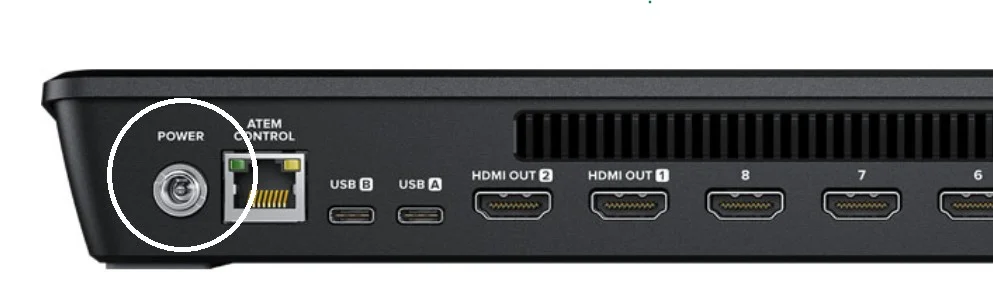
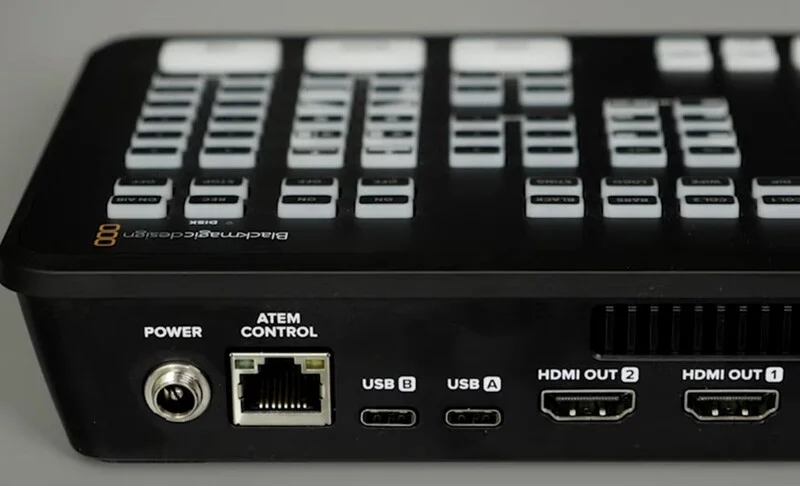
Of course, the first step to get it working is to connect the main power supply using the supplied power adapter.
If your power supply has a locking ring, tighten the connector to the unit to secure the connection to the ATEM Mini. This will lock the power cable to the ATEM Mini so that it will be prevented from accidentally being removed.
#2 Plug the Video Sources

The next step is to plug in the video sources.
You can do this by connecting your HDMI cameras and other HDMI sources to the HDMI inputs on the ATEM Mini Extreme ISO.
Good to know: The video format will then be determined by the first input you connect, so if you connect a 1080p50 video source, all subsequent inputs will be converted to 1080p50.
From there, you can now go ahead and select the large numbered buttons on the unit to switch between sources.
#3 Plug the Monitor & Start to Test Inputs
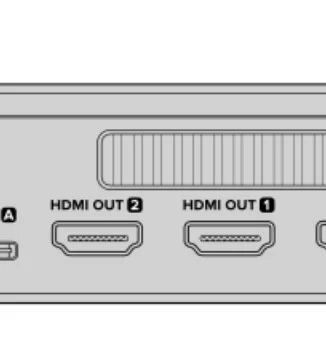
Now that your video sources are connected, you can now plug an HDMI chord to the ATEM Mini’s HDMI output and test all of the inputs. This is also a good time to check your sources and see if your shots are smoothly transitioning between each of them.
To do this: Simply press the numbered video out buttons on the ATEM Mini’s control panel and watch the HDMI television to test your sources. If your sources are working properly, you should be able to switch between them. The video out buttons on ATEM Mini Extreme models select the source for the second HDMI output.
The ATEM Mini Pro and Extreme models have a powerful multiview feature that allows you to see all of your inputs, as well as program and preview outputs, on one screen at the same time. This feature is called ‘Multiview’.
#4 Connect a Microphone
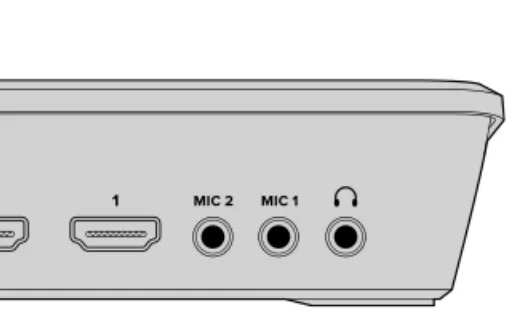
When you broadcast a PowerPoint presentation or a video, you may want to use a microphone to ensure that your voice is heard clearly.
There are two 3.5mm audio inputs where you can plug your microphone. Any kind of microphone should work there.
For interviews, use the second microphone input. You can also plug a music player into any of the audio inputs and have a nice mix into your production.
When adding the microphone into your audio mix, just press the ‘on’ button. This option will switch the microphone on air until you turn it off. An indication that the microphone is on air is that when the button is turned red.
#5 Cut Transitions

So far, sa good. By now, you should have your cameras and microphone connected.
The next thing you’ll need to learn is switching your production.
This occurs when you switch from one video source to another in your broadcast. Any HDMI video signal connected to the HDMI inputs can be used as a source. It could also be a still image, a keyer, or any internal source such as a color generator, color bars, or black.
To achieve a cut, here is what you would need to do:
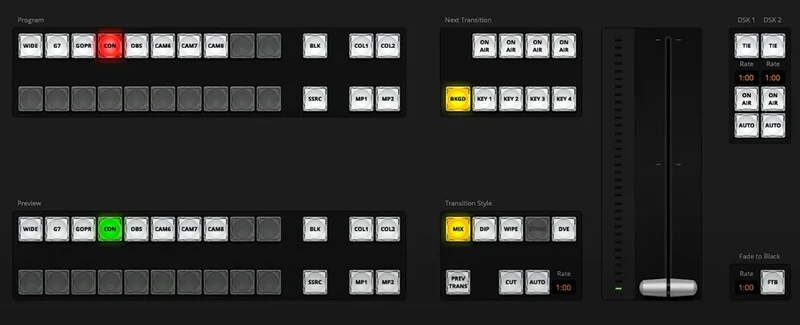
- Input 1 is showing red to tell you that input 1 is the one that is currently live on air.
- Choose a ‘cut’ by pressing the ‘cut’ button. Clicking ‘cut’ tells ATEM Mini Extreme that you want to use a straight cut rather than an auto transition.
- Now, you may press the input 2 button.
From there, Input 1 will now instantly swap to input 2 and you will notice that input 2 will now illuminate in red. This means input 2 is now the one that is live on air.
This is referred to as a cut because you are actually ‘cutting’ directly from one source to another.
#6 Connect to Zoom or Skype
Connect your ATEM Mini’s webcam output to your computer’s USB port. Your ATEM Mini will then be recognized as a webcam by your computer, and you can use it as the webcam source in any of your streaming programs, such as Skype and Zoom.
#7 Set the Webcam Source
Technically, your streaming software will automatically set ATEM Mini Extreme as the webcam. You will notice it when you launch your streaming software. You will immediately see the image from your ATEM Mini Extreme.
However, if your software does not recognize ATEM Mini, you may simply configure it to use ATEM Mini as the webcam and microphone.
Tip: Did you know that the ATEM Mini Extreme models can also stream directly to any streaming platform, including YouTube and Twitch? Yup, via Ethernet. This means you can use the USB-C connection to stream to YouTube while simultaneously recording your program to a flash disk.
This time, let us learn how to switch your production.
You can switch cleanly with ATEM Mini by using professional cuts or transitions.
A cut, for example, will change from one source to another instantly. Whereas a transition will change sources over a defined duration, often using an effect.
How To Use Cuts and Transitions
When you switch your video sources, you can use a straight cut, which changes one source to another immediately. You can also have a transition, which changes one source to another gradually over a defined duration.
Transitions appear as an effect, such as a cross dissolve or mix, a dip to color, or a stylized wipe, and there are numerous styles to choose from.
So, let’s get learning below starting from switching sources.
#1 Switch Sources Using a Cut
To cut:
- Input 1 is showing red to indicate that it is the one that is currently live on air.
- Click on the “cut” button. By doing this, it tells the ATEM Mini Extreme that you want to use a straight cut, and not an auto transition.
- After that, you may now press the Input 2 button.
- From there, Input 1 will now quickly switch to Input 2. Input 2 will now be showing red—which means it is the one currently live on air.
The process above is known as a cut as you are actually “cutting” presently from one source to another.
#2 Switch Sources Using an Auto Transition
Transitions allow you to smoothly switch from one source to another over a set period of time.
A mix transition, for example, slowly fades from the current source into the next until the primary source is no longer present.
A wipe transition moves a line across the primary source, revealing another and successfully wiping across the image. You may add a colored border or soften it so the edge is smooth and appealing.
And yup, you can even use digital video effects, or DVEs, to move the images as they transition from one to the other.
Transitions are indeed interesting. Below are some steps on how to do it.
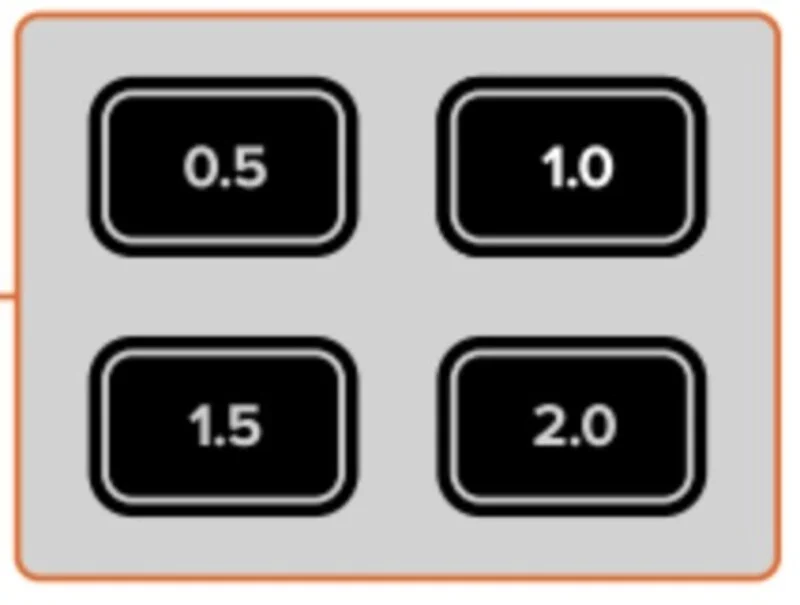
Mix auto transition:
- Click on the “mix” button to select a mix transition.
- Then, click on a duration that you would want for that certain mix.
- Press the “auto” button to tell your equipment that you want to use an automated transition.
- Then, click on the Input 2 button to perform the mix transition.
While the transition occurs and your broadcast changes to input 2, you will notice the input 1 and 2 buttons will show red. When the transition is complete, input 2 will turn red to indicate that it is now live on the air.
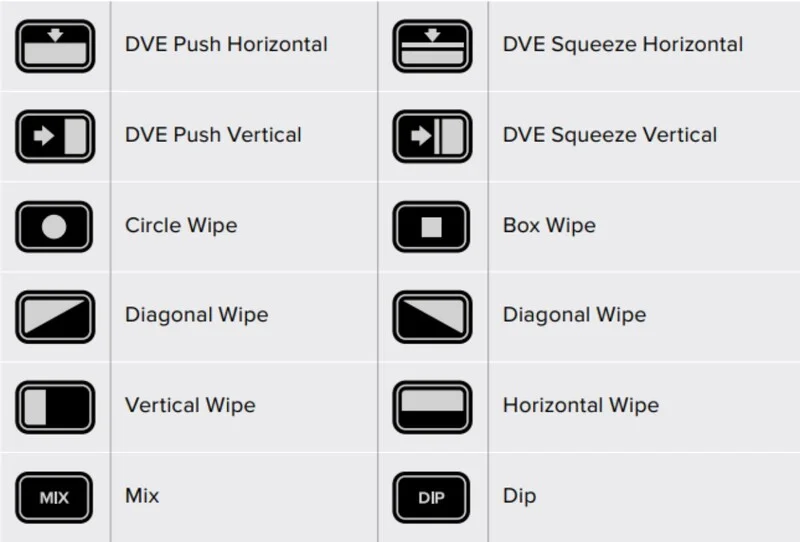
#3 Transition Styles and DVEs
Different transition styles, such as a mix cross dissolve and a dip to color, are available via the buttons above the “auto” button.
You can also choose between horizontal and vertical wipe transitions by pressing the transition style buttons. DVE push and squeeze transitions are also included.
The table below lists the various transition types available on the control panel. We recommend that you try all of them to see what fits your liking best.
#4 Control Your Audio
You will most likely want to control audio levels when setting up your production or during your broadcast, if the sound is too quiet or too loud. So no worries, because we will walk you through that as well.
When an audio level becomes too high, it will clip.
Clipping occurs when the audio exceeds the maximum acceptable level, causing distortion and undesirable sound.
The audio level for each input can be increased or decreased by pressing the up and down arrow buttons.
For example, if the presenter’s voice is too loud and risks clipping, you can reduce the audio level incrementally by pressing the down button until the level is safe.
Below is a quick guide on how you can control your audio.
ON or OF: Pressing either of these buttons will let you enable the audio from the current input source.
AFV: This stands for “audio follows video”. This will let the audio for a particular input be heard whenever the source is switched to be live on air.
Mute: This button on the headphone controls allows you to stop all audio playback, including program audio. If a presenter wants to mute the program audio while they are speaking, this is useful. When chosen, the button will turn red.
Reset: Clicking this button will restore the input audio levels to their default position. This is useful if you wish to undo any adjustments or go back to the level that existed before the changes were made.
Tip: Pressing the headphone input reset button on an ATEM Mini Extreme will reset the headphone level to its initial position.
#6 Using Picture in Picture
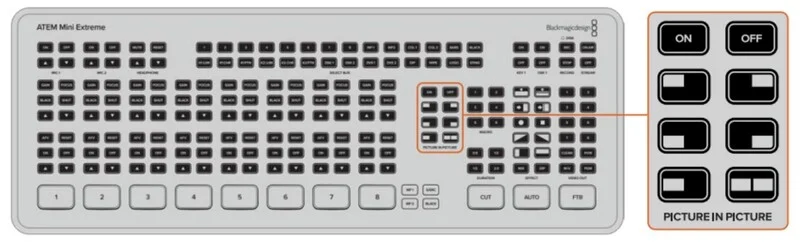
The picture-in-picture option develops a second source over your broadcast video source in a tiny box.
For example: If you’re streaming a certain gameplay and you want to superimpose your reactions, then connect your camera to input 1, and it will show up in the picture-in-picture. Input 1 is the default source for picture-in-picture.
To allow picture-in-picture:
- Plug the video that needs to be inside the box into HDMI input 1.
- Then, plug your main video into one of the other HDMI inputs.
- Lastly, press “on” in the picture-in-picture buttons.
From there, you will now see the picture in picture box to show on the screen. You may be able to choose a different position as well just by pressing any of the buttons.
#7 Using the Upstream Keyer
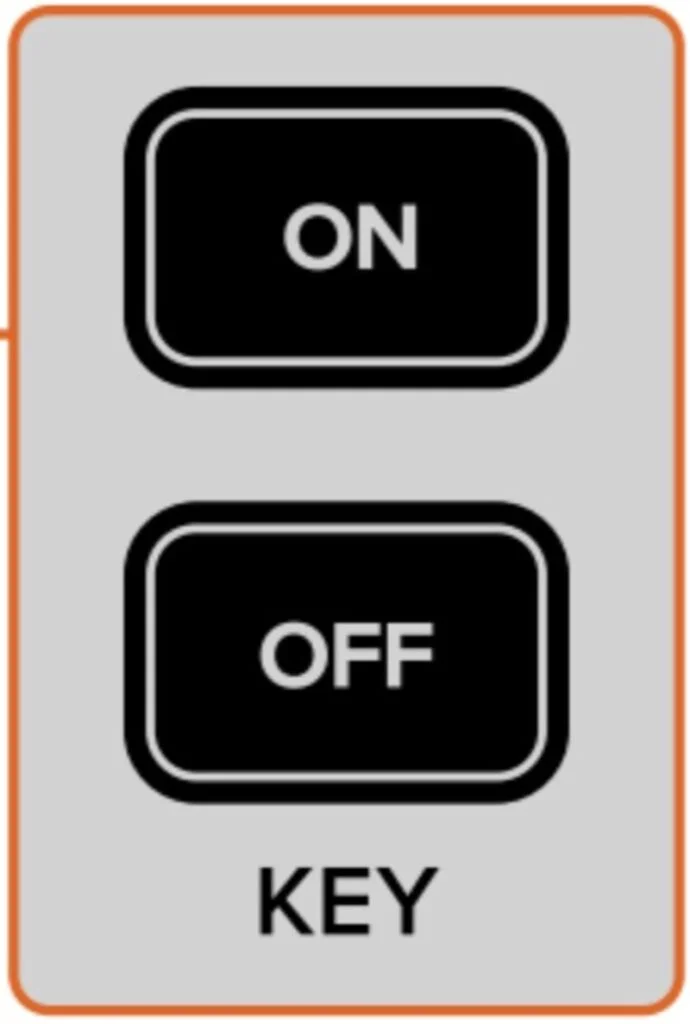
You can utilize the ATEM Mini’s Upstream Keyer to superimpose graphics or to blend one video layer over another using transparency.
This means that you can instruct your ATEM Mini to only use a particular area of a graphic using a luma or linear key, or to make the background color of an input source invisible using the chroma keyer.
For graphics in the bottom thirds, titles, and visual effects, linear keys are excellent.
Four upstream keyers are present in the ATEM Mini Extreme models. To turn upstream keyer 1 on or off, use the ‘key 1’ on or off buttons. You may use ATEM Software control or save them in a macro to switch to various upstream keyers.
Tip: The sophisticated chroma keyer in ATEM Mini is ideal for chroma-keying PowerPoint presentation graphics.
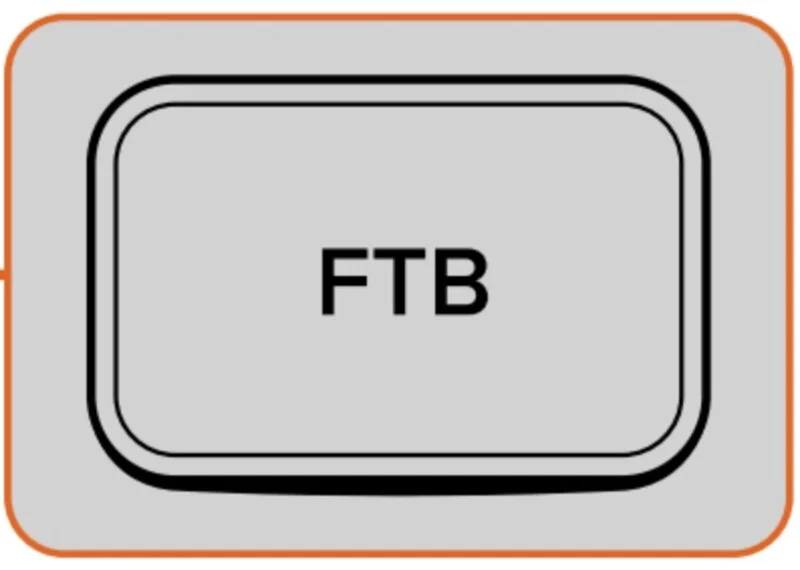
#8 Fade to Black
Live broadcasts can easily be started and stopped by pressing the fade to black button. Fade to black carries out a mix to black over all video layers simultaneously. This includes any upstream or downstream keyers that are visible in your broadcast, as well as all video inputs, stills, and keyers.
Keep in mind that the master program audio will also fade out to silence when performing a fade to black.
To initiate the fade to black:
- You must press the FTB button. When turned on, the button will flash.
- Simply press the FTB button once more to fade the screen back to white.
Tip: This is a tidy approach to starting and ending a broadcast.
#9 Using a Still Graphic
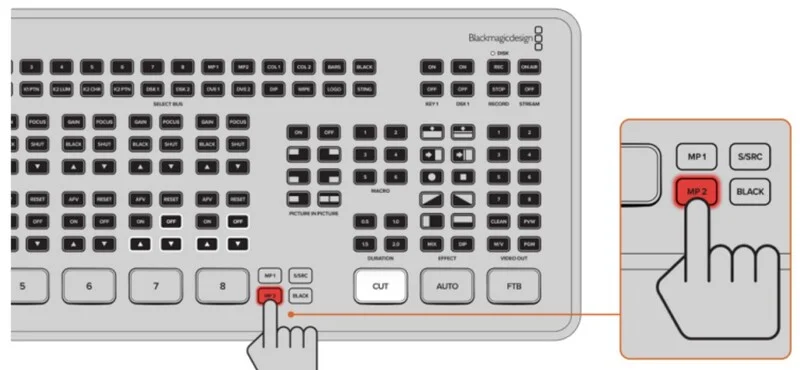
Another input source you can use in your production is the “still” button on ATEM Mini Extreme.
To put a still loaded in the media player on air, start by pressing the “still” button. Simply change to another input source to turn off the graphic.
You’ll see that the “still” button will change a graphic that is loaded into the media pool of ATEM Software Control. You can accomplish a lot more with ATEM Mini thanks to the incredibly sophisticated software control panel known as ATEM Software Control.
Overall, the instructions above are just some basic stuff that you need to know when you first use your equipment. There is still a lot more to know and to discover in your ATEM Mini Extreme the more you use it and the more you’re getting familiar with it.
Next, let’s review its performance.
Performance Review of the ATEM Mini Extreme ISO
With its many features and capabilities, it may take you a bit of time to become familiar with the ATEM Mini Extreme model.
The Mini, Pro, and ISO models all operate similarly when it comes to performance; they all successfully complete the same jobs with a few additional features. But believe it or not, those supposedly slight improvements have a big influence on usability and productivity—especially when it comes to the individual feed recording made available by the ATEM Mini Extreme ISO.
The multi-view functionality, which allows you to view each channel on a different screen, is a great performance benefit of the ATEM Mini Extreme ISO. With this, it’s easy enough to flip between each of your cameras. With the inclusion of a second channel, this capability is pretty comparable to a regular broadcast tricaster. See below for more details.
The real power you’re looking for in a performance of a device is in the ATEM Control software.
Here, you can start creating Macros and change sliders and settings in ways that go well beyond what is possible with just the ATEM Mini’s built-in functionality.
Some refined functions you should also try are the Macros for visual, and overlays. However, these functions would require you to access the software. We will discuss more of this later on.
Overall, using and setting up the ATEM Mini Extreme ISO needs familiarization at first, but it is actually quite simple when you get the hang of it.
And performance-wise, it’s excellent. If you are serious about dealing with videos and upskilling your career as a videographer, then testing out this equipment should be part of your list.
Okay, our next part is interesting because we will give you expert tips on how to handle your ATEM Mini Extreme or ATEM Mini Extreme ISO in the best way possible!
Tips and Trivia You Should Know
The ATEM Mini Extreme ISO is indeed a reliable and dependable piece of equipment. You won’t have to worry about getting a high-end PC to control streams. All you have to do is to use your ATEM Mini Extreme ISO and you should be all set.
So yup, below you can find some tips that you should know.
Tip #1: Stream Directly From the Hardware
Yup, it has the ability to stream directly from the hardware, so by all means, go try it. It will be like a bit of playing off a USB stick with media players as opposed to using a laptop or a computer.
Tip #2: Utilize the HDMI inputs
You may be thinking now that you may not need those 8 HDMI inputs so why would you get the ATEM Mini Extreme ISO anyway, but believe us, you might need it in the future. And you will definitely thank yourself for getting it.
Tip #3: Assign Your Headphone Output
Yes, it has a headphone port which is not present on some of its older models. It is also assignable and you can choose within its software what you want it assigned to.
Tip #4: You Can Switch From the Software Itself
With this option, you may now go through and do the switching and then you can also do some of the other stuff. You can also set your own streaming preferences.
Tip #5: The Recording Option is the Real Bargain, Use It to Your Advantage
On the previous models, you can report the output and that’s basically it. Just put a USB stick onto the back of your device and record your stream.
But with the ISO, you have the option to record all the inputs and what these inputs do as well!
That will give you a project file for DaVinci Resolve, which is Black Magic Design’s own video editing software, then you can then go back in and edit your stream using the original source recordings from each input.
Good to know: If you are recording in high quality, that is going to use a lot of data.
Tip #6: Expand Your Set Up By Using the Two USB Ports
Yes, this is another upgrade from its older models. From having just one, you can know use two USB ports to expand your set up. You may now stream directly via the built-in streaming encoder instead of attaching a drive to record locally.
Tip #7: Multiview Is Super Helpful
The Multiview option of the ATEM Mini Extreme ISO is completely customizable in every way compared to its older models. You can put different layouts and you can choose what you’ll want to see in every input.
It is useful because you can now see what is going on with each camera, as well as the audio levels. You can also check what your stream health is like. All the information is very helpful so make you you check this option out.
Tip #8: Explore SuperSource
Did you know that SuperSource can be equivalent to having a lot of processing power and a lot of GPU? Yup, it works wonders.
You can slide your camera to one side and make it smaller or animate it using macros. You can even change what you what to be in it.
Change the position and size? No problem. Want to crop it? Easy.
SuperSoruce just gives you the ability to do these different things at the same time. The potential of SuperSource is very huge and we are not even digging deeper yet on what it can do and how it can help you and your stream. Indeed, this is a very great feature to learn more into.
Tip #9: Utilize the Upstream Keys of the ATEM Mini Extreme ISO
You have four upstream keys. It’s a huge jump from just having one on the previous models. Make sure you use this option as it could really help you a lot, too.
With this feature, you livestream can easily be compared to that of a high-end gaming PC without even having one.
Tip #10: Create Macros & Run Them
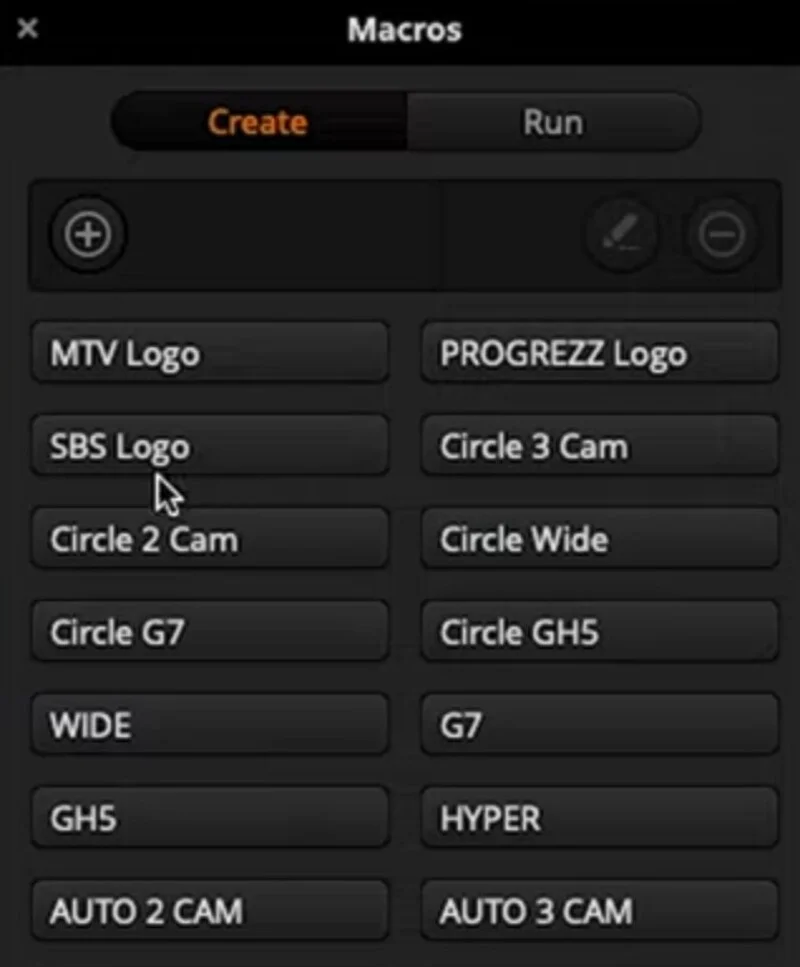
You can loop them you can do whatever you want. You can go in and edit them in an xml editor so you can copy and paste things around.
It’s worth bearing in mind you do not even need a computer to access your macros with the hardware.
For more information and tips, you can check this video below for in in-depth review on what you can do with the ATEM Mini Extreme ISO.
How Will the ATEM Mini Extreme ISO Could Help You
With our discussions above, you should now have a grasp on how the ATEM Mini Extreme ISO can help you as a videographer.
Below you’ll see the main points on how this powerful equipment can actually make your life better!
#1 It will shorten your editing process.
Instead of having to record two cameras independently, sync them up, and manually cut between them. By doing this, you can quickly switch between outputs, thanks to the ATEM Mini Extreme.
Whatever your camera brand is, the ATEM Mini Extreme ISO will have no trouble syncing with them. And no, it won’t even need any additional effort from you either.
This is basically one of the main things ATEM Mini Extreme can do for you as it makes everything easier, something we’d all want to achieve.
#2 It could animate lower thirds and social media reminders.
Yup, you can do it by using upstream and downstream keyers, which are overlays and several layers of video that can be chopped, modified, and transitioned in and out.
Instead of editing it after you have your supplemental footage loaded, the ATEM Mini Extreme ISO enables you to switch to it live.
#3 It can simply replace your existing streaming applications.
Existing streaming programs like OBS can be easily replaced by or integrated with the ATEM Mini Extreme ISO, too.
Using the USB connection, the computer can identify it as the most potent webcam in the world, making it instantly compatible with camera-enabled software like Zoom, Google Meet, OBS, and others.
It can also stream directly to services like Twitch, YouTube, or Facebook over its Ethernet interface.
#4 It can efficiently connect to your phone or tablet.
If you don’t have wired internet access, it can connect to your phone or tablet and stream remotely using your mobile connection.
Additionally, it may write directly to external storage via its USB-C outputs.
In short, it is very useful, wherever you go!
#5 Its capabilities are beyond simple video switching.
Yes, its features are crazy. We’ve already discussed a glimpse of these in the features and setting up sections of this guide, but here, we will let you know how you’ll benefit from these amazing features, too!
- The keying functionality is very useful for creating layers of transitioning media.
- There are also Chroma and Luma keyers for erasing green screen backgrounds or portions of the video that achieve a certain brightness threshold.
- Use masking to shrink, resize, and move these layers for picture-in-picture.
- In addition to borders and shadows, other effects can be employed to give a digital movie a more polished appearance. This is a suitable replacement for programs like OBS, but you can also use it to enhance the tasks that OBS already makes possible.
- Automatic picture-in-picture with controls designed especially for you. Never worry again about something so simple!
- Creative live effects that would otherwise be time-consuming and prone to error are now possible thanks to the use of macro recording to automate software actions.
- Choose from a range of transitional effects, including duration, with the press of a button.
With these benefits you get, you’ll only not save time, but you can also do more things and even be more creative with your craft. Be the best videographer by maximizing your tools.
#6 It’s very customizable.
All of this is made possible via Blackmagic’s ATEM software, which is effectively a home broadcast suite.
From there, you may regulate and customize every ATEM effect. You can even use it to operate the switcher if you’re filling in for a production engineer during a live show.
#7 And yup, its software is awesome!
The two highly exciting features made available by the software suite are SuperSource and Multiview.
In Multiview, you can use a grid that you can configure to view all of your different input sources at once. This capability is also used in professional production facilities for precisely scheduling transitions during live broadcasts, which is why it’s so amazing for monitoring different angles. Your entire production is obvious at a glance.
SuperSource on the other hand is what Blackmagic Design calls complex layouts, it is usually seen in news shows or online conferences. Some examples are the side-by-side talk show style layouts, multiple remote presenters giving a speech at the same time, or a panel show.
#8 It can even connect to 3rd-party plug-ins.
Yes! You can even connect it to a variety of third-party plugins.
Because these are relatively easy to set up and utilize, you won’t have to spend a lot of time learning to produce a broadcast or movie that looks beautiful.
If you don’t have Streamdeck, many of them can easily be attached to the built-in macro buttons.
While these above items surely will help you as a videographer, we still like to mention that the ATEM Mini Extreme models do have a bit of a limitation. As of now, the ATEM Mini Extreme ISO could only stream in 1080p, and not in 4K.
Well, it’s okay as of now, but with the continuous upgrade with 4K, and technology as a whole, this specific ATEM Mini Extreme model isn’t very future-ready.
Final Thoughts
If you are doing (or are planning to do) any live broadcasting and would like to be more mobile, more powerful, and more prepared for your program to evolve, the ATEM Mini Extreme ISO is a great choice for you.
It takes care of everything about how you’ll want your live broadcast to look. Power-wise, the ATEM Mini Extreme ISO is also superior to other competing products. You just need a few cameras, a monitor, and an internet connection and you are good to go to make a spectacular production!
If you’re also in a place with no internet connection, you can just use your phone to stream live content. Yes, no need to start a hotspot or find a long ethernet cable. Your phone will do. That’s how easy and handy it is to use!
We, at HayotFilms, are very impressed with its specifications. It comes with a ton of innovative features that, at this price point, just weren’t possible or accessible a few years ago.
If you’re the kind of event videographer who wants to have a powerful and reliable switching tool that can record your live streams, then the ATEM Mini Extreme ISO is for you.
Frequently Asked Questions
Is it worth purchasing the ATEM Mini Extreme ISO?
This is their top model because it has the ability to record each stream independently. It may seem like a small, expensive feature, but trust us, it’s valuable. So yes, it is worth it.
How can I broadcast using an ATEM Mini Extreme ISO?
Your ATEM Mini Extreme ISO can be used as a camera through USB C when streaming, plus it also requires USB C cable to connect the ATEM to the computer or laptop. From there, your computer will recognize the ATEM Mini Extreme ISO as a webcam when you choose it as the camera source in any of your streaming programs (Skype, Zoom, OBS, etc).
How can I use the multi-view option?
Simply click the M/V button on the video output control buttons on the front panel to select multiview.
Can the ATEM Mini Extreme record each video source in 4K?
Sadly, this is not something that can be done as of now. Low-end models in the series are only capable of handling 1080p.
Will this model get left out once a new model arrives?
While the newer model should be better, it’s great to know that Blackmagic Design usually updates their products as they go. The older models will definitely get updates too, however, there might be some limitations compared to what the newer models can do.