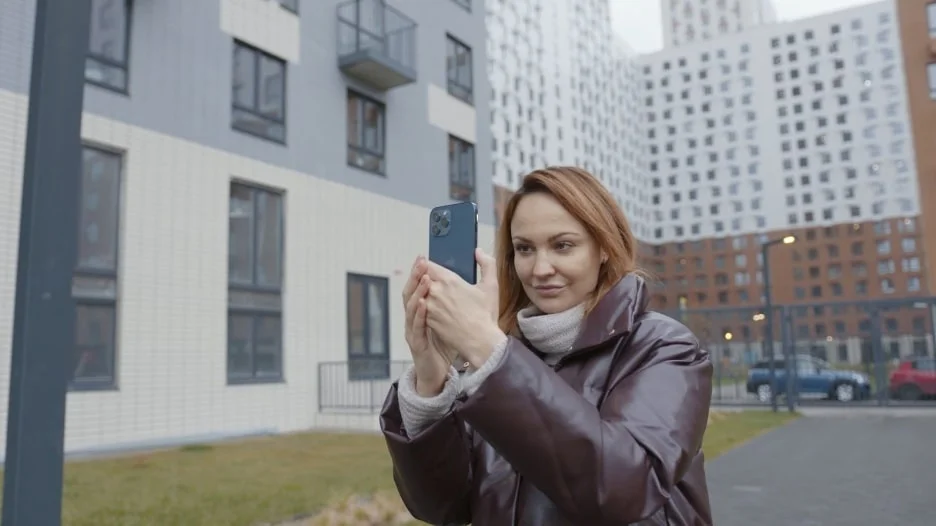
Do you have an iPhone and you’re wondering how are you able to shoot the best cinematic videos with it? Are you also wondering how could you make your footage stand out from all the others out there? Are you curious about what are the best iPhone filming tricks?
Well, you are definitely on the right track! Because here, you will find out the complete guide to shooting cinematic videos using your iPhone, or perhaps any mobile device!
Some people would think that when shooting cinematic videos, you would need to have big cameras, expensive lenses, a film crew, and lots of other complicated things—just like how they do it in Bollywood. But the truth is, you can still actually shoot a pretty nice video using the technology that fits in your pocket.
It’s crazy how phones are now capable of doing such things nowadays. But believe it or not, it is possible. And with the right techniques and tips, you are now on your way to being an iPhone expert when it comes to shooting cinematic videos.
And no, it doesn’t matter if you’re a Youtuber, videographer, or just an Apple owner willing to try these iPhone filming tricks for the first time. Everyone can try these tips.
One good thing to know is that iPhone and mobile shooting are here to stay in the next coming years, and it’s always a great idea to know more about them right now.
So, let’s start?
#1 Know Your Camera Settings
The first iPhone filming trick is to know your camera settings well. Having your phone’s camera settings in the best mode is actually going to be essential for making your videos look more consistent throughout the length of your film, and of course, more professional.
Here are some of the best tips we have to start off your camera settings correctly.
Take advantage of the 4K resolution
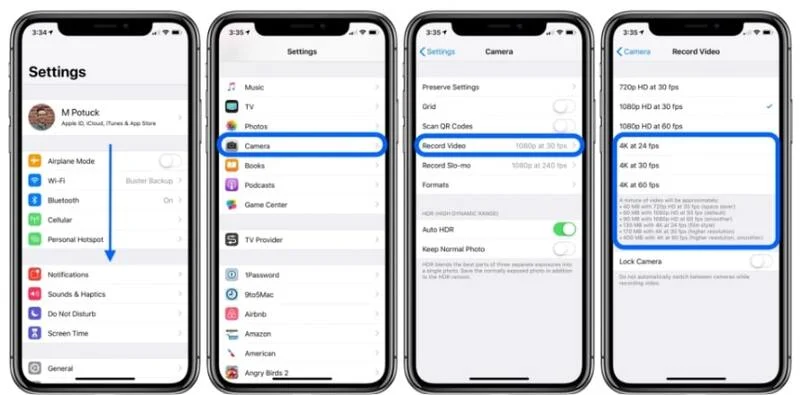
Did you know that 4K resolution is four times the resolution of 1080p? Yup, that alone should make a huge difference. Please note that depending on your iPhone’s model, the levels of the 4K resolution could vary.
To customize: You’d need to open ‘Settings’, and then tap on ‘Camera’, then ‘Record Video’. From there, you may choose 4K at 24 fps, 30 fps, or 60 fps.
If your phone doesn’t allow you to shoot 4K videos, that’s still okay. Just see to it that you are shooting at the highest resolution possible for your type of phone in order for you to get the best video quality as a result.
Change your frame rate to 24 fps
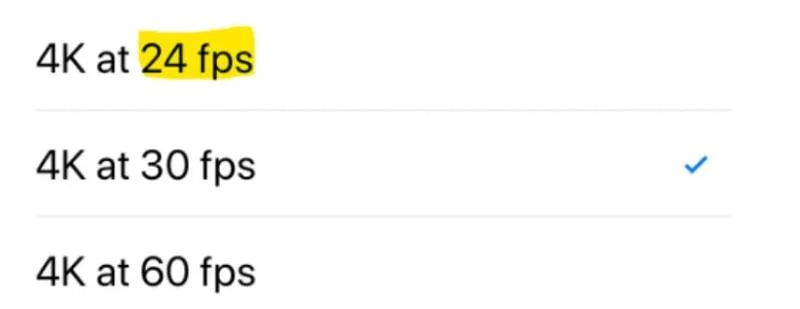
Your iPhone would probably have a default setting of 30 frames per second. But, did you know that Hollywood movies are shot at 24 frames per second? By changing to 24 fps, you will achieve the most cinematic look there is for you.
And the good news is, changing the frame rate on your iPhone is relatively easy to do!
To customize: Go to ‘Settings’, then ‘Camera’, then ‘Record Video’, then you would want to choose ‘4K at 24 fps’.
If you want to create slow-motion videos, you can also change the frame rate for that. You can always tap on ‘Record slo-mo’ to access these settings.
Most iPhones would record at the maximum possible resolution there is on your iPhone. So it is good to keep in mind that while these 30-60 fps videos look really fluid and smooth, they are not really the top choice for the best cinematic quality you would like to achieve.
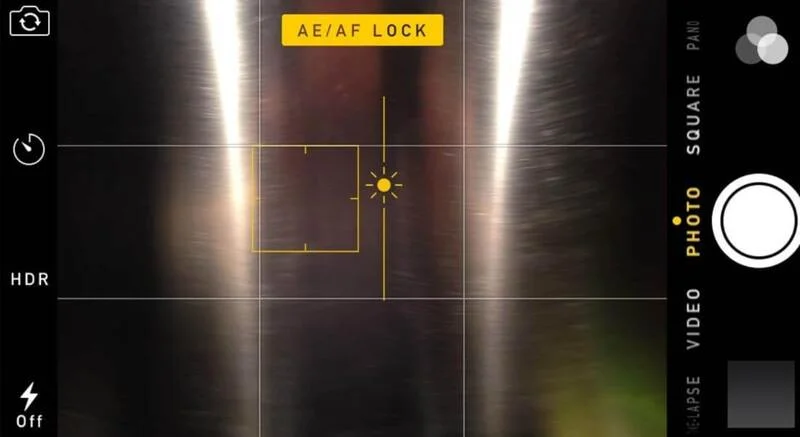
Lock your exposure beforehand
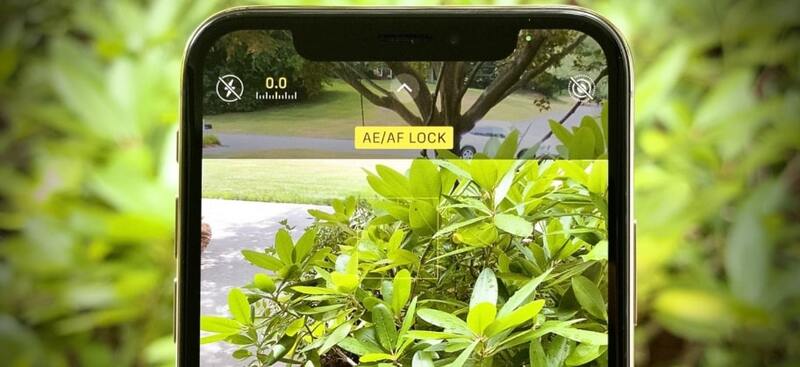
See? Your iPhone has a lot of great features so it’s best to really make use of it. Locking your exposure would provide us a more epic, and dramatic feel. This is also one of the most useful things you can do on your camera settings.
To customize: Just tap and hold on to that part of the screen you would like to lock for a few seconds. You may release your finger when you see an AE/AF lock sign as it means it is already activated.
By utilizing this, it’s going to allow you to hold the exposure in that place when you’re moving around and shooting. It is also not going to have the cameras’ autofocus and auto exposure change anything on your image or video footage. Definitely a must-do iPhone filming trick!
This is also a great option to use because it would allow you to make multiple photos or footage without having to set the focus and exposure for each and every shot.
And since we are already talking about exposure, it’s always best to…
#2 Have the Correct Exposure
This is one of the biggest known filmmaker mistakes. Always know that your footage will look amateur when the exposure of your video is constantly changing. For some, it is also most of the time a little bit overexposed.
Having the right balance of everything is the secret.
For example, when your subject is being backward by the sun, you can use a reflector to brighten your subject and match the brightness of the background.
You may also expose somewhere between your subject and the sky. Using your iPhone, click the Sky on the background and it will do its best to expose both your subject and the background.
So, how do you use the iPhone exposure settings? It’s easy!
Just tap on the iPhone screen where you want your point of focus to be. Once the yellow box with the small sun icon appears, you may move your finger up or down to adjust the exposure.
If you still end up with overexposed or underexposed footage, no worries, you can still fix it by clicking ‘Adjust’ and selecting ‘Exposure’.
#3 Shoot in the Right Light
This next iPhone filming trick is also connected to exposure. It is having the right lighting for your footage.
One of the main reasons people have been able to make iPhone video footages look similar to that of professional camera footage is because they shoot in the most ideal lighting conditions. Believe me, there is so much more to lighting than what you think when it comes to filming.
Here are some best lighting accessories you could look at for your iPhone. But if you prefer natural light, no problem!
Make use of the first and the last hour of the day.
Yup! Also known as the sunrise and sunset. This is believed to provide you with the best lighting results for your footage.
Having a hint of clouds would also give your footage a great outcome.
If you plan to shoot using natural lighting, always make sure to plan your day ahead. Professional videographers would usually search for the best time of the day wherever their location is at.
You can also search the great locations nearby that are known to be light-friendly. For example, if you are in Prague, you may want to check out the best locations in Prague for photo and video shooting.
It takes a little effort to find the proper lighting but in return, it could give you the biggest difference when it comes to your finished outcome.
Bottom line? Be a student of light.
Yup, whether you want to film casual events, or perhaps shoot corporate headshots, lighting should be in place.
Because the truth is, without light, there is no photography and videography. That is how important it is.
Always continue learning about light because as they say, using natural light is both the easiest and hardest form of filmmaking.
Experiment with artificial light. Play with natural light. Use the same subjects under different lights. Practice, prepare, and test in different light levels.
Now that we’re done with light, it is also always best to have a subject, which leads us to our next iPhone filming trick below.
#4 Get a Point of Interest
When shooting via mobile phone, people would tend just to shoot whatever is in front of them.
If they see a nice landscape, they shoot it.
If they see a unique place, they film it.
Well, there is nothing wrong with it. But there is not much to see in it as well.
One of the best things you can do to improve your footage is to include a point of interest or a subject. It doesn’t matter if it is a person or an object. Just include one.
Having a subject tells a story.

It will set you aside from the nice, but boring footage almost every new filmmaker creates. No matter what subject you choose, it will be more compelling and engaging to the audience.
Having a point of interest also allows you to do more on your video. It also provides some sort of context to the kind of beautiful landscape you plan on showing off in your video.
If you are still not convinced, just try to imagine footage of a nice-looking cocktail drink, with the video just zooming in on the drink. Then, imagine looking at another video having a person actually drinking it. Which one do you think looks better? You decide.
Don’t have anybody or anything to shoot? No problem!
As a last resort, you can always shoot yourself. Just set your phone at a different location from where you are, whether it’s on the floor, on the table, or even on a tripod.
Try to walk into the frame. Engage with the environment around. Show something cool and unique for your potential audience to see. Believe me, it is going to make a huge change to your original no-subject footage.
#5 Utilize Different Focal Lengths
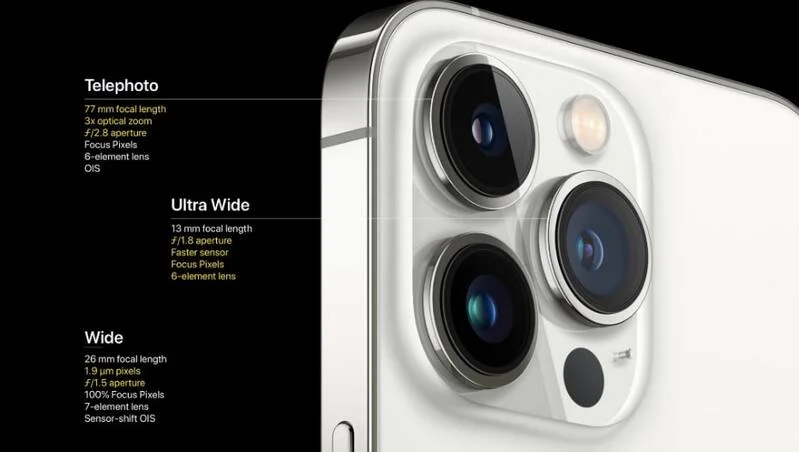
It is true that focal lengths are the major benefit of any smartphone nowadays. And that’s why we have it as our fifth iPhone filming trick!
Most iPhones would have a wide-angle lens, a normal lens, and a zoom lens. This would essentially allow you to capture three different points of view.
We recommend shooting every shot at least three different times on these focal lengths to know which is your best shot and angle. At the same time, this is also another way to make your videos more immersive by showing different angles and perspectives of your point of interest.
Plus, it is always nice to have all these options when editing, right?
You can get third-party lenses, too.
Yup, the best lenses out there can do a huge change to your footage. While the iPhone camera is getting better and better, there are still some physical limitations to it that these third-party lenses can provide.
If you have the budget for it, then we recommend getting one. By having an add-on lens, you can do various other things on your iPhone such as opening up new shooting possibilities you’d never known you could do.
Of course, it is not required to have these lenses. You can just use what you have on your current iPhone and still nail a great video, still own an excellent story-telling footage, and still be ahead of others with the skills that you are continuously learning.
In fact, the iPhone already has wide, ultra-wide, and telephoto lenses. With these alone, you can already explore a lot.
But again, it’s also a fact that the more options you have, the easier it is for you to tell your story.
#6 Put Effort to Your Composition
If you are wondering what composition in mobile filmmaking is, it is the way you arrange the visual elements of a scene in your camera frame to show your message to the audience.
Again, the message in your scene is very important. That’s the reason why we have to put effort into our composition well enough to reach our target audience the way we intended it to be.
Fill the frame into your subject
One of our biggest pieces of advice is to always make sure to fill the frame into your subject. Why? Because it is one of the biggest mistakes, too. People would usually film way too far from their subject, and it’s a no-no.
Imagine the difference of having a video that is not close enough on the subject. And then just zooming it in and losing the video’s quality in the process. Doesn’t seem nice at all, right?
Now, imagine comparing it with a video where the camera is actually going closer and closer to the subject, making you feel that you are actually there. It would show you different angles and perspectives. It is obviously more compelling to the audience.
When you put an effort to go closer to your subject, it will also create depth in your footage which is very important in your videos as well.
Use the rule of thirds
Keep the horizon on the top or bottom part of your shot.
Yup, the rule of thirds is one of the very commonly used iPhone filming tricks. It’s basically about the right position of the subject on your screen to show their relation to the other characters or elements in that scene.
It’s pretty much like a tic-tac-toe board.
To use the rule of thirds effectively, position your more important elements in your footage at the intersection points. It will then show a much more natural and aesthetic scene.
Know when to balance
Having knowledge of composition rules is very important for filmmakers, but knowing when to break them is just as needed.
This is where balance and symmetry shots come into the scene.
If you prefer for your scene to cause more tension, you may use this technique. This will direct your audience’s attention to the center of the screen, and when done well, it could make your story better and more effective.
Utilize Leading Lines
This is very interesting because these are actual or imaginary lines that would lead the viewer to the footage you want them to see.
You may use this leading lines technique to lead your audience to where you want them to look. You can also use this to connect your subject to an important object, event, or situation.
This is known to be a very useful type of composition for filmmaking because it provides context to the audience in an artistic way.
Note: The composition guidelines listed above are more like suggestions that you can try using when filming via your iPhone. It should guide you, and not stop you from doing your own unique filming style.
Want to know more about these techniques and how to use them? You may want to check the video below to dig more into it.
Now that we know the composition basics, it’s time to learn how to grab that first attention. Let’s go!
#7 Get an Attention-Grabbing Opening Shot
Yes, this is super important.
This shot will basically establish the sequence for your audience. You should be clear on where your sequence is taking place.
It’s a good thing that iPhone nowadays has some pretty good image stabilization, so you wouldn’t worry too much about getting a shaky shot.
One good way to start a shot is to walk slowly toward your subject while pushing your camera forward.
Always remember that the first impression lasts
This first shot will either get your audience enticed with what is about to happen, or they could just be bored and leave. You should be able to convey a message or an idea of what your footage is about by making sure you have a powerful opening scene.
If your film is about life, you may show them a symbol of life at the start.
And if your footage is about struggles, show them a glance at how your subject struggles at the beginning.
Have a video about dreams? You may show how optimistic your main character is at the start.
Be as artistic as you can when trying to think of a great opening shot. Work hard to make that first impression count as it is your audience’s initial entry into the world you are trying to let them in.
If you want to know how other filmmakers do it, you may want to check these Greatest Opening Shots From Recent Movies as well.
#8 Learn the Proper Camera Movement
One of the essential things when it comes to making your footage look cinematic is the proper camera movement.
The biggest mistake people make when they are shooting is when they just stand in one position only. They would have the tendency to just move their camera up and down, and then left and right. By actually doing that, it doesn’t really give your footage any movement. It’s more on just changing the orientation.
In order to have better footage, you would have to do more.
Try some cinematic movements!
Moving in and out from your objects or subjects as opposed to just standing in one position would be really helpful.
Using a gimbal would be a great help for smooth movements as well. This is also recommended in filming corporate events.
But if you don’t have any budget for it as of now, we would recommend just familiarizing yourself with holding your camera properly for better motion and movement in your footage.
First, you can try holding your iPhone with your fingers around the corner of the phone.
By that, it will give you a full range of movements to turn and pull in and out and make different cinematic movements.
Sounds easy, right?
Once you are already familiar with that technique, you can now try adding a slight rotation to your camera movement.
One of our favorite techniques is called the light flicker. This is definitely a great way to level up your mobile cinematography. Use the light, play with it, and make great footage from it.

How to use the light flicker: Reveal the sun and make it flicker. You may either gently move your focal point so the sunlight flickers on your film or you can move your camera and enjoy the beautiful effects of the flickering sunlight.
By using this technique, your footage will look dramatic and at the same time, beautiful. You will definitely not going to achieve this if you just stand up and move your camera.
Knowing how to move your camera and capture shots is relatively straightforward. You just need a little bit of practice and you will surely be good at it in no time.
Types of iPhone filming tricks or movements you can try:
- Follow Forward
- Follow Backward
- Reveal Shot
- Parallel Track
- Orbit Shot
- Continuous Shot
- Masking Shot
- Tilt Up Shot
- Transition Shot
Curious about how to do these shots? No worries. The video below will show you how it is exactly done! It’s simple and easy, and it will make your mobile footage extra lively. Have a look.
#9 Buying the Best Gear
Okay, so it’s true that you can try and create excellent films and footage with just your iPhone. Some even believe that it could also be a cheaper version of filming since you don’t need to buy the gears available anymore.
Well, I hate to break it to you, but if you want excellent quality and better footage, you still might want to invest in the best gear to amp up your cinematography on your mobile device.
While these are not required (especially if you are on a budget), it’s still best to consider investing in gears—especially if you plan to film for a living or if you plan on continuously shooting in the long run.
Here are some of the best ones you can take advantage of to make your iPhone filmmaking stand out.
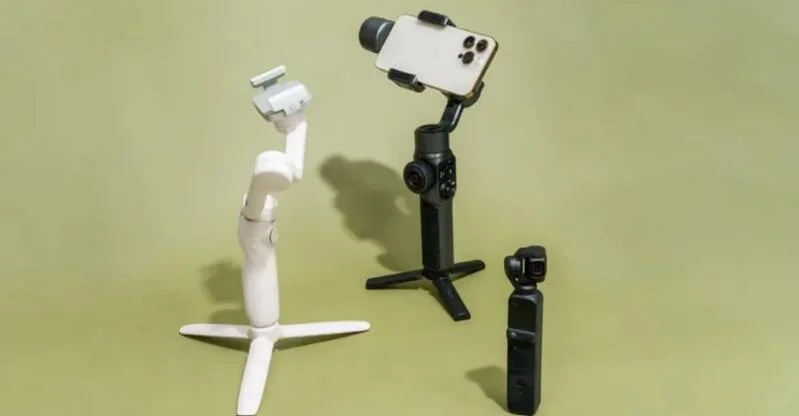
Have a good stabilizer or gimbal
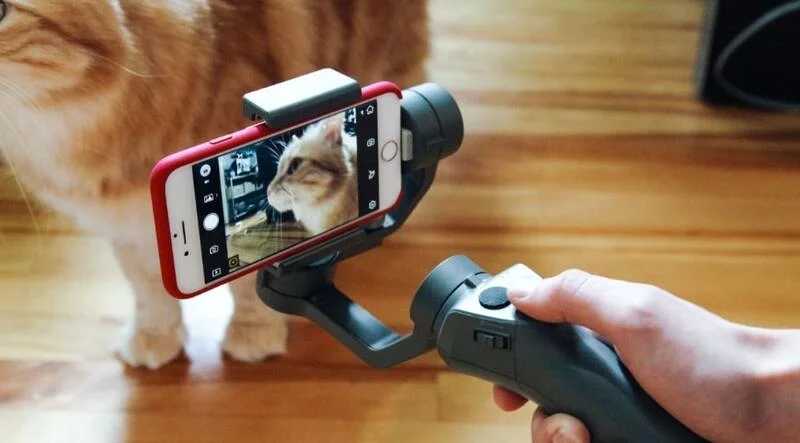
Having a stabilizer will immediately make your videos from zero to hero. It will make it look like a professional one.
Sure, you can still take great photos and videos without a stabilizer, but if you want your shots to be enhanced, then we absolutely recommend investing in one. In fact, one of the major factors that new filmmakers encounter is the shakiness in their videos.
The good news is that the iPhone (especially the newer generations) has established great stabilization on the camera itself. You can take smooth shots even in slow motion with it. You can definitely try this thing first if it works well for you.
But if you are the kind to consider getting the best gear right away, then below are the benefits you could get:
- Get an even smoother footage
Getting a stabilizer or a gimbal will smooth out bumps in your footage, that the in-camera stabilizer of your iPhone couldn’t hide. If you want something that is easier to use and provides dynamic results, then this extra piece of accessory will fit your needs.
- It eliminates the shakiness
This is more specifically for a gimbal. It eliminates the ‘shake’ that comes naturally from the human muscle.
- It could communicate to your phone
While the basic stabilizers would just keep your footage stabilized, there are versions that would even give more power to your camera via its app, settings, and even Bluetooth. It’s crazy how the machines work nowadays!
- Some models fit your phone perfectly
Yup, some stabilizers are made exactly for your certain phone model. It is designed to fit your phone’s size and settings. It could also do every little thing to enhance your specific needs. Before you get a stabilizer, it’s always better to check if there are specific ones designed just for you.
But still, you have to be careful…
Why? Because most gimbals need a caseless iPhone to fit properly.
With this, you may have to take extra precautions when using your phone in filming adventurous stuff. Before you do anything extreme, be sure you are ready if something bad happens to your phone. Have it insured, or prepare a backup phone. You do your own preparation.
Gimbals and stabilizers are a great way to get wonderful footage with your iPhone. But please note that buying a camera gimbal doesn’t just magically make your shots better.
You still have to practice using it. It doesn’t take out the dipping of the camera as you work with it. You would need to do the bent leg sort of walk that takes out the vertical movement as you are moving with your camera.
Just start slowly, and then you’d be a master of duck-walking soon.
Add Lenses for Better Videography
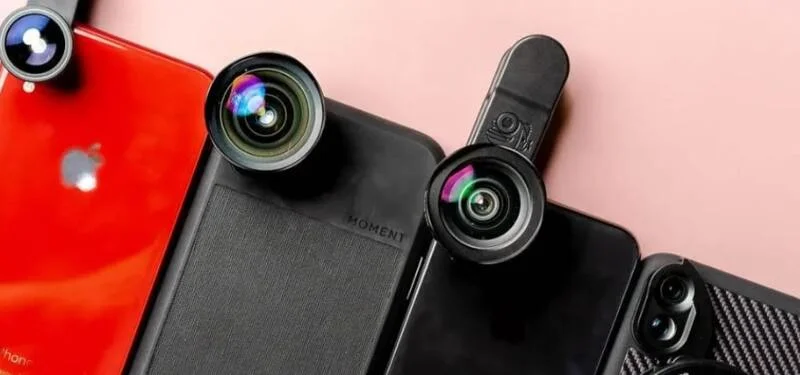
Another great addition to your gears is the lenses. I know we’ve mentioned earlier that this is optional and is not required, but since we are now talking about gears to improve the overall footage of your iPhone—let me ask you a question: Why do you think filmmakers have a collection of lenses?
It is because they are definitely helpful to your overall results!
If you want to capture breathtaking footage wherever you go, then getting lenses for your iPhone will help you with low lighting, wide shots, macro shots, and more.
And no, it is not as big and as hassle as you might think. You can actually just clip them on your iPhone. It also comes with tutorials on how to use the different lenses when shooting. It’s handy and efficient to use.
The Xenvo Pro Lens Kit and KEYWING 3-in-1 Lens Kit are good choices to start off. Plus, the prices are reasonable too!
This video can also give you an overview of the best lenses to date that you can choose from.
Use Microphones for Better Audio
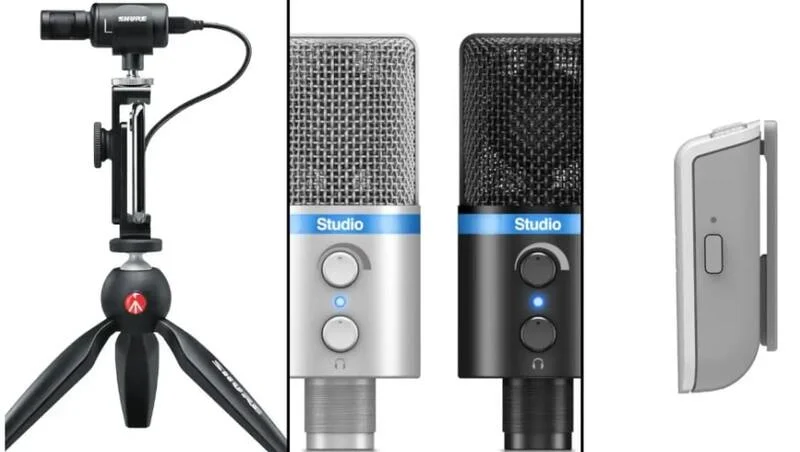
This is very important if you want to produce quality videos. Unless you prefer using music or voiceover only, then that would not be the case.
But if you want to film yourself or other people talking, then this is a must. You don’t want to rely on the iPhone’s ability to capture audio, especially if your iPhone has a 3.5 mm headphone jack. Unfortunately, that one isn’t ideal to capture great audio.
Good to know: Investing in a microphone for production will significantly raise the quality of the overall footage that you will produce as the final product can also be as good as the audio you have captured.
The number of gadgets you can add to your iPhone really depends on you. There is a huge market for all these different iPhone accessories that are available. Always make sure to only purchase the ones that you really need and the ones that would enhance your footage well.
Because these gears could only help you enhance, the power to film and edit still relies on your hands.
#10 Shoot to Edit
New filmmakers would usually have the tendency to just start shooting everything without actually giving their shots much thought as to why there were shooting them in the first place and how they would connect correctly to the overall story they are wanting to convey to their audience.
And that is where the term Shoot to Edit comes from.
What is Shoot to Edit?
It is a term used in filmmaking wherein you’ll have to think about the sequences and cuts together while you are still shooting them. With this, you would have a variety of shots and angles available for you when it is time to edit your footage.
It is recommended to do some deep thinking before you start shooting and imagine how you would like your video to turn out and also what emotions you want to see in your footage.
With this, you can shoot your shots depending on what you have pictured in your vision. You would also have an idea of how you’ll want to edit it after shooting.
Transitioning between the same shot and different locations using the same framing and the same movement would also be an artistic way when shooting to edit.
For example: It would be awesome if your character from a different scene leaves a location while running, then another scene shows up, and another character is being chased by someone or something else.
By this, you are moving forward with your storyline smoothly, while not sacrificing the transitioning at all.
If you don’t shoot to edit, you would have a hard time asking yourself questions such as: “How would I even put all these pieces together?” when you have finished filming. Something that you wouldn’t want to experience.
We also recommend reading Best and Worst Things To Do in Prague in December | Czech Republic in Winter and Best Corporate Venues in Prague.
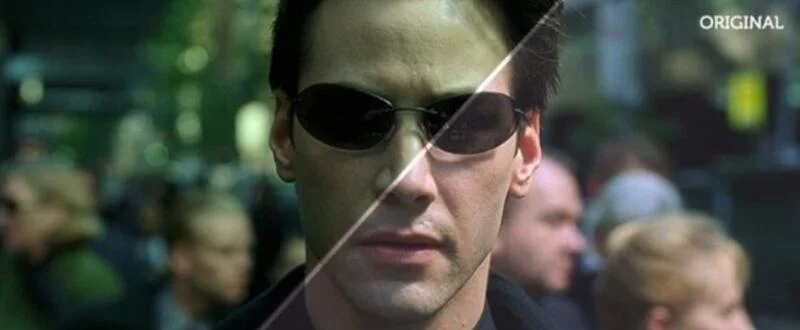
#11 Color Grade Your Footage
Would you not want to have appealing and vibrant colors on your footage?
Color Grading makes so much difference from just using the regular color on your film. By color grading your footage, it will easily make your work look extra professional.
The thing is, the camera apps on iPhones and smartphones tend to be really highly saturated and highly contrasted. You can make your image more cinematic if you actually lower the saturation and the contrast of your image or footage in your editing suite.
By doing this, not only it would look more professional, but it will also disguise the fact that your footage was shot using an iPhone only! Believe me, color adjustments make a long way in filmmaking.
You can try all the color adjustments to your liking until you are happy with the results. Then, you can add the distinguish black bars at the top and bottom of your video to make it more cinematic-looking.
Seeking help from Color Grading Apps for even better and easier results could also be an option.
Once you’ve mastered color grading your footage, you would notice how big of a change it makes to your videos. It is going to take your iPhone footage from being amateur to something highly polished that you could even use for a client!
#12 Capture Professional Audio
We specifically had this on our iPhone filming tricks because as they say:
“Audio is half of the viewing experience.”
Yet, most amateur filmmakers still neglect it. They just focus on the visuals.
Well, it is true that great footage would come to life if you have really good visuals. After all, humans are naturally visual species. But still, would you like to see a perfectly shot video with bad audio? Wouldn’t you cringe if you hear a bad quality sound? I would!
A great video and audio should be partners
Both should be able to accompany each other and compliment each other. That is when you’ll finally reach the cinematic level we’d all want to achieve.
The video below will show you the importance of putting the correct audio in your film and how it could change your film to a totally new level when done right.
As you can see, the audio makes a huge gap in making the film come to life.
When dealing with dialogues, don’t just use audio straight out of your mobile phone. As we have talked about earlier in tip #9, there are available microphones available for you, so make sure to utilize that as well.
Take time to polish your audio well and it will surely give you astonishing results in return.
Bonus: Now let’s discuss iPhone Cinematic Mode
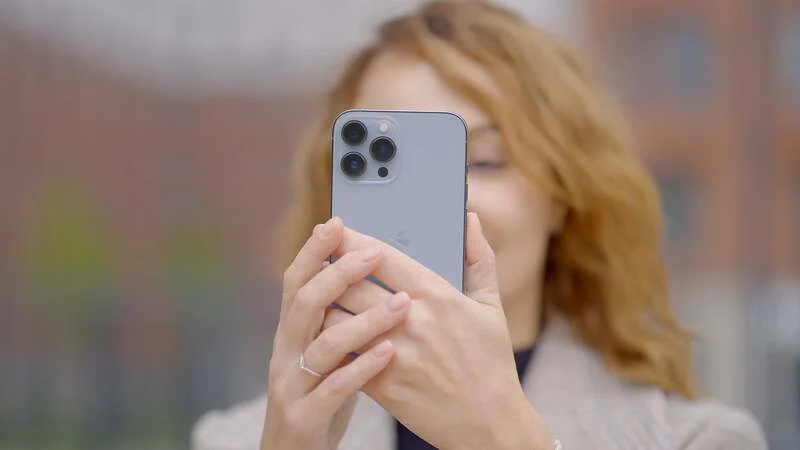
If you have an iPhone 13 or iPhone 13 pro, then you might want to check some tips on how to maximize its cinematic mode feature.
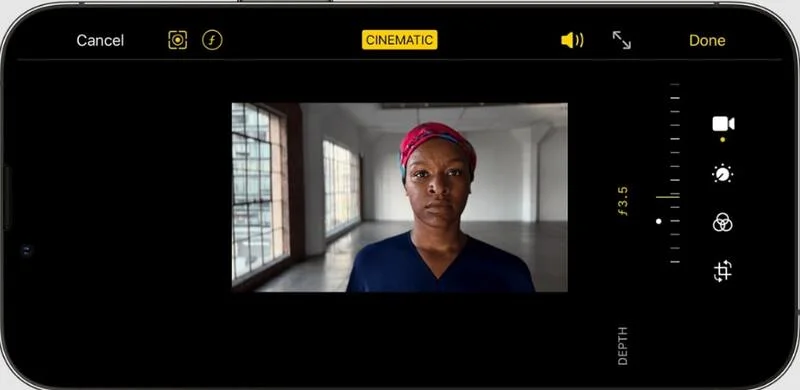
The cinematic mode in your camera allows you to capture video that looks like it was taken with a real filming camera, giving you that shallow depth of field.
And yup, it is just the iPhone software doing it.
Mind-blowing, isn’t it?
It’s insane how it works, too. When you shoot your video and you tell where your subject and focus are, it would then mask that out, and then it will blur the background instantly. If your iPhone can do that now at any time, just imagine how even greater it could be once the technology advances in the upcoming years.
Crazy, right?
So, let’s dig into it!
In this bonus round, we’ll show you how to squeeze the most out of the cinematic mode and come as close as possible to a professional camera.
Control your exposure
To do this, swipe towards the top of the iPhone (portrait mode when swiping). You will then reveal the exposure control dial that you can use to adjust your exposure manually. It is also good to know that the tap and drag no longer work in cinematic mode.
Always remember not to over or underexpose.
Lens aperture adjustments

Unlike the traditional filming cameras, the cinematic mode doesn’t use aperture to create a shallow effect. But you can still control your aperture by tapping on the ‘F’ at the top of your screen. It will then provide you with a slider to control its aperture settings.
This will allow you to adjust the blur in your cinematic mode—best used in cases when the blur isn’t much needed.
Airdrop your footage without losing quality
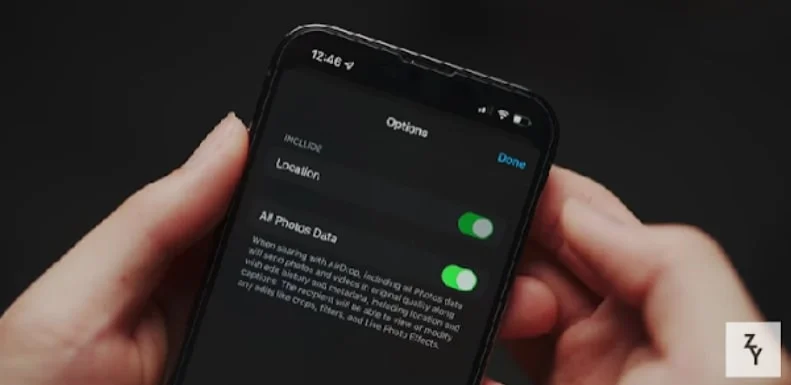
When you transfer media from your phone using the Airdrop feature, make sure to click ‘Options’ first and then toggle on ‘All Photos Data’.
By doing this, you are making sure that the receiving device gets all parameters and editing access to the sent cinematic mode footage.
You won’t be able to make changes to the depth of field or the focus when you don’t click on ‘All Photos Data’. And note that you need to do this to every Airdropped video as it automatically defaults off.
Utilize Final Cut Pro
By using Final Cut Pro, you can still have full control over the cinematic mode settings such as controlling the blur or the focus on your film. It’s like giving you access to edit it all over again using your computer this time.
Just import the right file from your folder, and choose the .MOV (not the one with an ‘E’). Alternatively, you can also use a wired connection to transfer the files.
Try your best to get it right while shooting
At the time of shooting your footage, your lenses are actively adjusting too, and that is something that we cannot adjust post-filming. Some subjects might look softer than what you intended them to look like.
And although there are a lot of camera apps available to help you with this, nothing still beats you doing it right during the actual filming. Make it a best practice to film shots that satisfy you so your editing time will be less and would also meet your expectations.
Know your frame rates
Currently, the iPhone cinematic mode only records in 30 frames per second. This means it will always be best to plan ahead, especially if you’d like to add some footage to a video with a different frame rate.
For example: You have a video in 24 fps. For your video to run smoothly, you might want to adjust the speed to 80% speed so that the playback would be nice and it won’t skip frame rates. This will have a smooth performance on your transitions.
Turn on HDR in camera settings
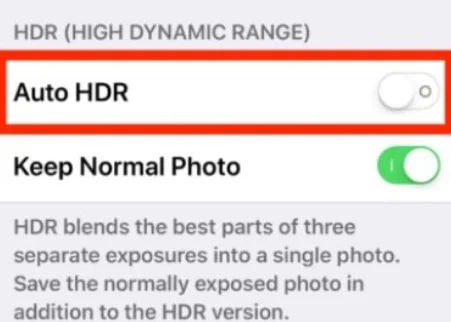
By enabling this option, the HDR mode will record your footage in 10-bit compared to the 8-bit for standard video. This is actually a huge jump in quality because recording in HDR provides 4x more brightness per channel and it will also maintain the quality while editing.
So yup, might as well have it turned on to make sure you are maximizing the benefits of the functions of your iPhone 13. And of course, you can still use and switch it back to the SDR timeline if you would prefer.
The cinematic mode is really impressive as you can see. It’s actually surprising how Apple was able to pull that off. It brings life to a whole new way of creating video content and we’re actually excited to see what more it could offer in the future.
Will the iPhone filmmaking tricks get to a point where one could not tell the difference between the footage on iPhone compared to real professional cameras?
Who knows, right?
It could be possible, though. We just have to wait.
But… are there any drawbacks?
Of course, there still are. Here are the two main items that could use improvement.
Masking out the subject
The focal length of the software would sometimes have a hard time masking out the subject and blurring the background. There would be a significant amount of blur around the edges of the subject.
It’s limited to 1080p at 30 fps
Don’t get us wrong, this is definitely already good quality and we are thankful for it. But of course, it would be better if we had the option to use 4K and change the frame rates to 24 fps to 60 fps in the future.
Again, the iPhone technology is continuously growing and changing quite rapidly so we’re assuming that these options and drawbacks would soon be advantages of the cinematic mode in the coming years.
Final Thoughts
Whether you have an older or a newer iPhone, you can absolutely take great footage in your filmmaking by just learning these skills and techniques.
And now that you have these with you, it’s time to try it by yourself. Challenge yourself to create footage on your iPhone using all the tips that we have discussed here and see for yourself how nice it will turn out.
But still, don’t forget to have fun in the process.
After all, learning a new skill always takes time, but it is always going to be worth it in the end especially if you love what you are learning and doing. Just don’t stop discovering every day. Try different techniques. Make every mistake, then learn from it.
You may not notice it, but as long as you are consistent in what you do, you’d be a pro in no time.
We sincerely hope you have learned something in our iPhone filming tricks guide. See you at our next one!